Blog 7
At last, here we are at the final stage of ICPD! Everything that we have learned from the first lesson up till this point has been a fulfilling experience for me.💆 In these few weeks, we learned about design specifications and prototyping for our product. Moving on, I will bring you guys through the design specifications, our prototype, how to assemble our device plus how it works!
1. Design Specifications
Design specifications are important as they give detailed information on what a product should achieve. It is NOT the description of the product, but it is meant to help people design the product.
Things like being compact and corrosion resistant are some examples of physical and functional specifications. In our case, since my group's product is a hairbrush that can dispense hair products, some design specifications would be that it is compact and lightweight. This ensures that the user will be able to use it wherever, whenever they want. Our hair brush should also be inexpensive and sustainable so that it can be long-lasting without the users having to buy a new one every now and then.
So, this is the specification table that my team collated!
Specification Table
2. Prototyping
Prototyping is pivotal as it helps us improve the overall understanding of our design. It enables us to transfer our ideas on paper, to what it will look like as the final product. Prototyping can also be done in many rounds, based on what is needed to be altered to the design. Hence, it can help to mitigate the failures of the product.
In class, we watched a video of the marshmallow challenge that took place. The results show that kindergarten kids performed much better than adults and university students. 😲 Why? This is because the children thought of what they wanted to build, assembled it, and tested their designs. They repeated the process and made changes to it if it did not work. They did not spend so much time "fighting" for power, instead, they used their time to keep building prototypes.
Hence, it was important for my group to spend more time coming up with multiple designs for our prototype so that we could save time and complete it before our final presentation😀. We also had to think, build, and test our prototype to see if it is fully functional😋
2.1 HIHHY Hairbrush Design Sketches
Our hairbrush is called the HIHHY Hairbrush (pronounced as "hehe"), which name originated from each of my group member's initials! (Pretty cool right 😉) We managed to design sketches that included cardboard joinery and the measurements were sufficient to hold at least 50ml of hair products.

These are the different components of our hairbrush, consisting of the handle (with slot and tab), and the brush head. We visualized how we were going to connect both of the components together using cardboard joinery, as we could not use a thread in cardboard (which is used in our final CADD design).

The sketch on the left is a more detailed sketch of what it will look like inside the handle of the brush. This was our initial idea, to have a piston to push the hair product out. However, it was not really considered to be a mechanism. Dr. Noel then advised us to try and use a rack and pinion, which is shown in the sketch on the right. The gear (outer circle) will be rotated along the pinion (red line), and at the end of the pinion, we attached a flat platform for the hair product to be stored. When the gear is pushed, the pinion will be pushed upwards where the hair product can flow out through the pores of the brush.

This is the inside view of the handle after we decided to use the rack and pinion mechanism to push the hair product out. In order to fulfill our design specifications of making our hairbrush compact, We decided that the total length of the brush would be around 22cm, which is less than our design specification of 24cm! 😇
And these are the measurements for the brush head.
2.2 Fabrication process of the prototype
These are the steps to make the hairbrush using cardboard!
Handle:
1. For the rack, cut out 3 rectangles of length 60mm and width 20mm.

.jpeg)
3. Cut out a rectangle with a length of 60mm and 9mm for the width. Tear it along the flute. This will act as the gear for the rack.
.jpeg)

5. For the pinion, cut out 3 circles with a 30mm diameter. Glue all of them together.

.jpeg)

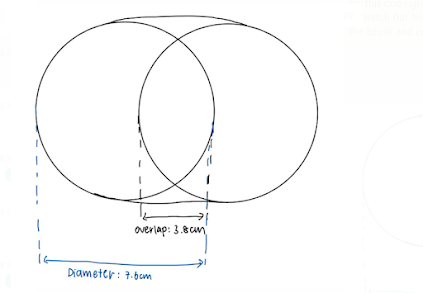
1. Using a compass, draw 2 circles of diameter 7.6cm. Overlap both circles and ensure that the length of the overlap is 3.8cm.

3. Repeat Steps 1 and 2 to create another oval.
4. (cut out the strip idk the length)
5. Use duct tape to tape the 2 ovals and the round strip together. It should look like this:
(the other oval has not been placed. place it on top of the other end of the strip)

6. Using a sharp skewer, poke holes on the surface of 1 of the ovals.
7. Insert cotton buds into the holes on the oval. These holes act like pores and the cotton buds are a representation of the bristles😗


.jpeg)
9. Flip the oval over so that the rounded side of the cotton buds is facing upwards. The final look:

Insert the handle into the hole of the brush head. This is the final product!

3. How our hairbrush works
Attached below is a video of how the rack and pinion operate inside the brush handle!
As you can see from the video, the pinion is rotated along the short length of the handle. Since it is connected to the rack, it acts as gears and pushes the rack upwards. The hair product will be stored in the compartment above the rack, so when the rack is pushed upwards, the hair product will be pushed upwards as well.
This allows the hair product to flow all the way to the head of the hairbrush, and flow out through the pores (due to gravity).
The operating principle that we incorporated is positive displacement. The chemical engineering principle we focused on is rheology as hair care products are generally more viscous than water, hence there will be difficulty in pushing the hair care product out.
4. CADD Design
And this is the CADD design we did on Fusion360! Pretty impressive, right?


Comments
Post a Comment