After all these weeks of discussing how to design our chemical device and the different materials used for different devices, how do each of these devices actually work? Every device has its own operating principles, which help them complete its function. This week, we learned about the different operating principles applied to different devices and processes, and we also had some time to think about how our OWN chemical device worked!😊
Do you still remember what my group's chemical device is? It's a brush that can dispense hair products! This makes it easier for users to scrub their hair while showering. It also makes it more convenient for them to apply the different hair care products that they need.
So what exactly are the operating principles of our device? It makes use of positive displacement, as the piston is triggered to push the hair care product out. Additionally, gravity is needed to let the product flow down from the brush onto the hair.
But are these operating principles enough to push the device to its fullest potential? Mechanisms are used to enhance the operating principles used. What is the difference between operating principles and mechanisms? Well, operating principles are the fundamental assumptions on what principles the device uses in order to work. Mechanisms transform forces and movement into a desired set of output forces and movement. 😎
There are 6 main types of different mechanisms:
1. Actuators
2. Cams
3. Gears
4. Levers
5. Rachets
6. Springs
Let's move on to how we applied different operating principles and mechanisms to different devices!
1. Ping Pong Ball Shooter
In this lesson, we were to design a ping pong ball shooter using at least 1 of the different mechanisms mentioned above😗.
Here is my team's design:
As shown in the image, we decided to make use of springs to launch the ping pong balls. The ping pong balls will be loaded and they will get pushed upwards by a spring. Then, there will be a rectangular catch that is able to be pulled back. This will compress the spring inside the gun and when released, the force will push the ping pong balls outwards, allowing them to be launched.
2. Cardboard marble machine
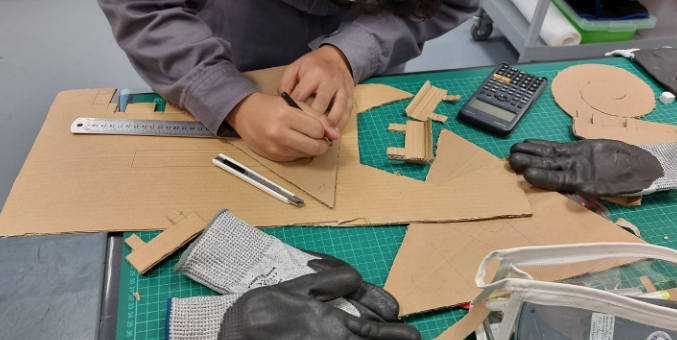
Next, we were tasked to use cardboard to create a marble machine. The goal was to create a machine to let a marble run through it continuously for at least 30 seconds. Do you remember the last time we worked with cardboard? Yes, it was in practical 2! Where we had to create a structure using at least 6 different cardboard joineries.
We were given a limited time to work with since our practical was 5 days later than when we were first briefed on what we had to do!😓😖 Moreover, we were only given 2.5 hours to construct the machine before presenting it to the class. Hence, we had to start earlier to make the different parts of the machine, then assemble them together on the big day.
2.1 Marble Machine Design Sketches
The original design my team wanted to go with was this:
We were thinking of using gears to make the wheel turn. There will be a knob on the smaller circle to help us turn the wheel. The marble will enter the wheel from the hole at the bottom, and be brought up to the hole on top (using the gears). It will then slide down the path and be brought back to the hole at the bottom.
However, this design was challenging as it was hard to create the spiral path and join it to the wheel. Additionally, it would be difficult to connect the small gear and the wheel, while making the gear accessible on the outside.
Hence, we decided to tweak the design a little:
In this design, we just had to make 2 triangles (one at the back, one at the front) and connect them to the wheel. For the smaller gear, we can make use of skewers and connect it to the lower side of the triangle, while ensuring that it stays in contact with the wheel.
The marble has a diameter of 2.2cm, hence it was crucial that we made the dimensions of the machine as accurate as possible. This is so that the marble will not fall/slip off while running the machine.
Here are the dimension sketches my group did:
2.2 . Assembling the machine
Next, here are the steps we took to assemble the marble machine!
1. Cut out 4 circles with a diameter of 19.6cm. Make holes of 3cm diameter on the 1st circle, 2.6cm diameter on the 2nd circle, 2.2cm on the 3rd circle, and 1.8cm diameter on the 4th circle.
Poke a hole through all the 4 circles. Use a skewer to hold them together.
2. Cut out 2 triangles of 33.9cm on 2 sides and 30.5cm on the bottom side.
Poke a hole through the triangle such that it aligns with the wheels. Use a skewer to join them all together.
3. Cut out 2 small circles of a diameter of 7cm (for the small gear)
4. Cut a strip of cardboard the length of the circumference of the big wheel. Afterward, peel one side of the cardboard to reveal the flute. Glue the flute on the circumference of the wheel.
Do the same for the smaller gear.
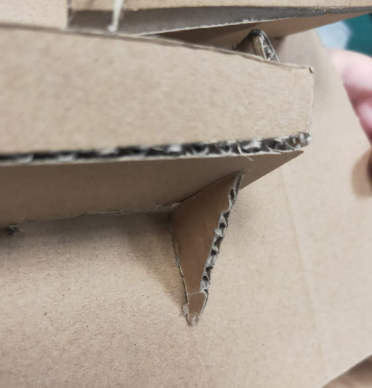
5. Make 3 L-braces in a form of a triangle, at a 90 degrees angle. This will support the platforms the marble runs on.
6. For the platforms the marble to run on, we used the slot and tab joinery. The pathways are separated and are increasing in length as we go down the triangle
Cut out the paths following these dimensions:
Starting from the top(length)
1. 7 cm
2. 10.5 cm
3. 11.6 cm
The width of the path is 3 cm for all. The wall is 1.5cm. The corners to block the marble is around 2cm.
Extruding part (tab) is 1 cm by 1cm
Slot is around 1cm by 0.5cm
7. Cut tabs in the triangle following these dimensions. This is to accommodate for the pathways that will be slotted into the triangle
8. Use a skewer to join the smaller gear to the bottom left-hand side of the triangle. Ensure that it is in contact with the wheel.
9. Use a fastener to hold the tip of the 2 triangles together. This will ensure that the marble will not slip out while spinning the wheel.
Finally, the finished product!
Our Ferris wheel marble machine in action:
It looks pretty cool, doesn't it? Our marble managed to go through at least 3 rounds through the machine!
Hero shot with our machine😄
3. Reflection
The process of making the marble run machine was tough as we had to tweak our measurements multiple times. Assembling the machine was also extremely time-consuming, and I am glad we decided to start earlier to prepare the parts. There was no way we could finish constructing the machine in under 2.5 hours!
This experience made me realize the importance of planning and executing in advance. I am glad my team and I were able to make use of different joineries to combine the different parts of the machine together.
Another important thing was practicality. All of us expected the machine to run smoothly, but that was not the case when we were doing the test run. The marble fell out multiple times and the gears got stuck. Fortunately, we were able to come up with a solution to let the machine run rather smoothly. I also learned to not choose a design that looked too complicated, and that I should focus on the gears that will be used to run the machine.


Comments
Post a Comment